Explore the top 7 ways you can solve common Quickbooks problems with automation.
When using QuickBooks accounting software, one of the most essential processes to know is how to receive payment from a customer for sales transactions.
You may be using QuickBooks Online or QuickBooks Desktop. This guide shows you how to receive and accept payments through QuickBooks Online. With QuickBooks Online, your business can receive payment with a credit card, debit card, ACH bank transfer, or PayPal payment methods.
QuickBooks Online automatically receives and records online payments from customers when it’s connected with QuickBooks Payments. When not using QuickBooks Payments, use the QuickBooks Online menu steps indicated to receive and record customer invoice payments.
Using the Tipalti Accounts Payable Automation App for QuickBooks to Pay Supplier Invoices
Small businesses and medium-sized businesses use QuickBooks Online bookkeeping and accounting software. Intuit owns QuickBooks and TurboTax. Suppliers using QuickBooks Online can invoice and accept customer payments.
The QuickBooks receive payments service is very affordable for its small business users. QuickBooks Online charges a transaction fee for credit card payments, debit card payments, and ACH payments. As you can see in the linked Intuit QuickBooks web page, transaction fees for QuickBooks Online vary by the type and method used. ACH bank transfers, card swiped, card invoiced, or card keyed have different processing fees. (Rates differ for QuickBooks Desktop users.) You’ll find out how to process credit card payments in QuickBooks Online.
Tipalti is an AP automation application, which integrates with QuickBooks Online and QuickBooks Online Advanced. Use Tipalti with your regular QuickBooks Online login and software interface. Tipalti handles the entire accounts payable processing workload. It automates online payments to suppliers and vendors using a choice of global mass payment methods. Using Tipalti saves you up to 80% of accounts payable processing time. It shortens the time to close the financial books by 25%. Tipalti is available as a SaaS subscription with a monthly fee.
The Tipalti AP automation app for ​QuickBooks Online provides the interface portal for suppliers to onboard themselves. Vendors enter their contact information. Then they upload tax forms, upload invoices, and select their preferred payment method. Self-service supplier onboarding saves your accounts payable department a significant amount of time. It also increases data accuracy.
How to Set Up QuickBooks Online to Receive and Accept Payments
Screenshots for Receiving and Accepting Payments in QuickBooks Online
The following explanation includes screenshot steps to apply for and use QuickBooks Payments with QuickBooks Online from a tutorial. The screenshots are from a November 6, 2019 QuickBooks Online YouTube video titled How to Set Up QuickBooks Payments | QuickBooks Online.
Your business receives and accepts customer payments differently when it isn’t using QuickBooks Payments. These screenshots are from a QuickBooks Online December 9, 2019 YouTube video titled How to Record an Invoice Payment | QuickBooks Online.
Receiving Payment through QuickBooks Payments
Accepting and receiving payments from customers through QuickBooks Online is easy. To automatically match and apply a customer payment your business collects to invoices, use the Payments feature. Don’t enter the customer receipts as deposits.
For QuickBooks Online users approved and enrolled in QuickBooks Payments, QuickBooks Payments processes the customer’s payment. Recording customer payments in the appropriate accounts is handled automatically by QuickBooks Online software.
How to Apply and Start Using QuickBooks Payments with QuickBooks Online
To use the QuickBooks Payments feature, register with Intuit through your QuickBooks Online software by providing information about the business, business owners, and merchant account. Not every small business that applies is accepted for QuickBooks Payments.
Intuit Merchant Services is the payment processor. Online stores use payment gateways for e-commerce. A payment gateway allows your online store to connect to your merchant bank account. It acts as a ‘virtual terminal,’ as opposed to a card-swipe terminal.” If you need a payment gateway, you can set it up after you get your QuickBooks Payments account to receive customer payments, as described in this guide.
You may already have a merchant account with Intuit’s Merchant Services or GoPayment. You still need to follow this process to connect it with QuickBooks to accept payments from customers.
To start receiving payments in QuickBooks Online, click the Settings gear icon on the top right side of the QuickBooks Online toolbar.
When the Settings menu opens, choose Accounts and Settings, then Payments. You’ll see this screen:
You can accept payments through QuickBooks, emailed online invoices, and mobile. Mobile devices include your iOS or Android phone or tablet. The bank transfers are ACH payments.
If you’re already using Intuit Merchant Services or GoPayment for payment processing, press the Connect button. Otherwise, press the Learn More button to set up Payments through QuickBooks Online.
The next screen labeled Business lets you enter business information in a form. The second screen labeled Owner/Proprietor is a form for entering business owner information. To verify your business, Intuit uses business and owner information.
The third screen, labeled Bank, asks you to connect to your bank account (by entering your bank username and bank password). QuickBooks asks you to enter the bank account into which payments will be deposited. On the Bank screen, Intuit states:
“By selecting Next, I authorize Intuit to debit my bank account on file for payments services fees on a daily basis, starting the day after my first transaction. I can cancel at any time in my QuickBooks account settings.”
You’ll see another Intuit notice near the bottom of the Bank screen and the following screen:
“By selecting Submit, I agree to the Intuit Merchant Agreement, the privacy policy, and the pricing. I provide my “written instructions” to authorize Intuit to pull my credit report to use for this service. “
If you agree, press the Activate Payments button. That completes the process of signing up for accepting QuickBooks Payments. QuickBooks will send you an email within about the next two days when you’re approved for using the service.
You’ll receive your first customer payment in your bank account within five business days. After receiving your first payment, you’ll get customer payments much quicker to help your cash flow. That’s by the next business day (or even the same business day for eligible accounts).
Ways to Accept Payments in QuickBooks with QuickBooks Payments
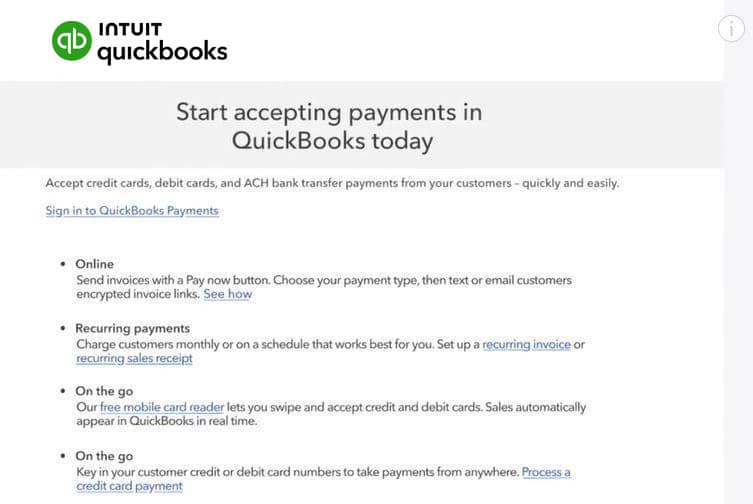
The following screenshot shows how you can use QuickBooks Payments:

Using QuickBooks Payments, you can select your favorite payment type and send online invoices to your customers with a Pay Now button.
You can set up recurring invoices and recurring sales receipts for recurring customer payments.
Choose to accept PayPal payments by issuing eInvoices with QuickBooks Online.
Receive Payment through QuickBooks Online without QuickBooks Payments
If you don’t use QuickBooks Payments, follow these steps to accept, record, and receive invoice payment from customers in QuickBooks Online.
If customers pay immediately, discover how to create a sales receipt that records the transaction in the linked QuickBooks Online support page.
After you’ve finished invoicing customers that pay on account, you can choose which of two menu sequences you prefer to use for a payment received from a customer.
Receive Payment through the Sales or Invoicing Menu Sequence in QuickBooks Online
The steps when you start with the Sales or Invoicing menu in QuickBooks Online are:
> Sales (or Invoicing) from the side menu
> Customers in the pop-up menu
> Select the customer’s open invoices being paid
> Receive payment
> Save and close.
Receive Payment through the Customer Menu Sequence in QuickBooks Online
The steps when you start with the + New button, then Receive payments in QuickBooks Online are:
> +New button from the side menu in QuickBooks Online
> Receive payments
> Type in the Customer name
> Select the invoice that the customer paid in the Outstanding Transactions section, using the checkbox
> If the invoice is fully paid, QuickBooks Online automatically includes the full amount
> For partial payments, enter the amount of the partial payment in the Payment box instead
> Enter the Payment date
> Choose the payment method and add any reference number needed, like the check number
> In Deposit to, choose an option from the drop-down menu for customer payments:
> If the invoice is not already deposited, choose a temporary Undeposited funds account (also in your chart of accounts) until the single deposit or batch bank deposit of multiple invoice payments is made
> Record payments when you record the bank deposit you’ve made.
> If you choose Checking account for a deposited payment instead of Undeposited funds, then the invoice balance is shown as zero if paid in full, and the payment is recorded. As part of the transaction, the accounts receivable balance is reduced by the invoice payment amount.
> Save and close.
To check for accuracy, from the Reports menu, you can run a Customer Balance Summary report in QuickBooks Online to check the open accounts receivable balance for a customer.
Accepting Card Payments in QuickBooks Online
You have choices in how to accept card payments through QuickBooks Online (credit or debit).
If you don’t already have the point of sale equipment, Merchant Services will send you a free mobile card reader for receiving mobile payments. You can request the free mobile card reader from a link in your QuickBooks Payments approval email. Use this QuickBooks point of sale device for customer card processing. Insert chip cards, swipe, or tap to capture customer debit or credit card information and processing.
QuickBooks card payments options available through Intuit payments include:
- Visa
- Mastercard
- Discover
- American Express
- Apple Pay
- Bank cards
Besides credit and debit card transactions, you can choose ACH payments to receive payments from customers that you’ve invoiced. You may also want to check out our guide to understanding how much QuickBooks charges to process credit & debit card payments.
QuickBooks Payments Review
We’ve covered how to receive payment from customers in QuickBooks Online, both with and without a QuickBooks Payments connection.
This guide explained how to set up QuickBooks Payments from QuickBooks Online through Intuit Merchant Services. Our simple explanations include step-by-step screenshots. You can accept and receive online payments, including PayPal, in-person payments with a mobile card reader, or debit or credit card numbers manually keyed in. You can also accept ACH payments from customers.
If you’re not using QuickBooks Payments with QuickBooks Online, see the steps for receiving payment and recording a customer payment transaction. By automating your accounts payable with the Tipalti app for QuickBooks Online or QuickBooks Online Advanced, you’ll have significant time savings and labor savings that favorably impact your cash flow. When using Tipalti AP automation, remember to let your suppliers, contractors, and vendors know about this guide for receiving payments in QuickBooks Online.